 I just wanted to do a quick post to show you the Pirate Feast we had to celebrate my son's first birthday! We also had savory treats but they did not look so Piratey! We had a great day with lots of friends and family visiting, but I am not looking forward to the clear up today so much! Arrrrrr
Sunday, 12 February 2012
Baby's 1st Birthday!
I just wanted to do a quick post to show you the Pirate Feast we had to celebrate my son's first birthday! We also had savory treats but they did not look so Piratey! We had a great day with lots of friends and family visiting, but I am not looking forward to the clear up today so much! Arrrrrr

Thursday, 9 February 2012
How to Make Rocky Road treats and Valentines sweets
In preparation for my son's 1st birthday party I have made some Rocky Road treats and thought that I would treat my family to some sweeties at the same time!
What you will need:


For the Rocky Road treats I used milk chocolate, white chocolate, chopped nuts, marshmallows and dried apricots. And for the sweets I used Silver Spoon flavoured buttons in orange and strawberry, plus a sprinkle selection.
I also used a chocolate fondue melting machine but you can melt the chocolate in a bowl placed over a pan of hot water. Finally I had several moulds and I choose to use the heart and butterfly shapes as well as the first initial of my parents and sisters!
 The first thing I did was place the milk chocolate into the pan, whilst this was melting I chopped up the apricots and mixed up these with the nuts and marshmallows. Next I simply poured over the milk chocolate and mixed this in with the 'Rocks'. I wiped over the pan and melted some of the white chocolate and whilst this was happening I had an opportunity to shape the treats into similar sized balls, the beauty of this dessert is that it is supposed to look rocky and therefore presentation is very easy!! Here is how the treats turned out:

As you can see I ended up with quite a lot as I did use 2 bars of chocolate and all of the extras, so I hope everyone will like them!
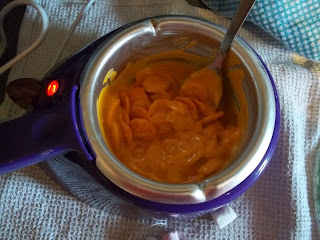 Next I made my sweets, which are even easier than the Rocky Roads! So I simply melted the buttons in the fondue pan as you can see. Whilst this was happening I placed a few decorations in my moulds.


What you will need:


For the Rocky Road treats I used milk chocolate, white chocolate, chopped nuts, marshmallows and dried apricots. And for the sweets I used Silver Spoon flavoured buttons in orange and strawberry, plus a sprinkle selection.
I also used a chocolate fondue melting machine but you can melt the chocolate in a bowl placed over a pan of hot water. Finally I had several moulds and I choose to use the heart and butterfly shapes as well as the first initial of my parents and sisters!


As you can see I ended up with quite a lot as I did use 2 bars of chocolate and all of the extras, so I hope everyone will like them!


I stuck to sprinkles for ease but you can use icing writing pens for a more detailed design if you like!! Next I simply poured over the melted buttons into my moulds and put them into the fridge for a few hours to re-harden!

You can see here the letters, butterflies and hearts. I have placed mine into little boxes to give to my family tomorrow but they would also like nice in clear plastic bags tied up with a ribbon. These are great as Valentine or Mother's Day gifts or just as little thank yous! The sweets also taste really great and my favourite is the orange which does taste just little orange chocolate!
I got all my supplies from Tesco's but you can also buy Candy Melts on the internet which come in a variety colours.
I hope you all have fun making your sweets and treats!
Sunday, 5 February 2012
Small Primark & H&M Haul
I popped into town this week as I wanted to have a look in Primark for a few cheapy tops. I got back to my pre-baby weight 5 months ago and have not been on a strict diet since however we seem to have carried on eating a lot more healthily than we did before and I happy that as a result I am still losing weight! Its not a massive difference but even a few pounds makes you feel good when you didn't even mean to diet! Anyway I wanted to get a few pieces in a smaller (hooray) size but didn't want to spend too much money!
Here is what I got:
 I got this cute cardigan in H&M and I think it was a bargain at £7.99. I really like this preppy style and find these so useful for just throwing over any outfit, or they look nice with jeans or skinny trousers buttoned up to the top! H&M had lots of different colours so I may be tempted to back and get a couple more!


Sorry that these pics are up the wrong way, I am not sure how to turn them!! These 4 tops were all from Primark and I went for styles that I will be able to wear throughout the Spring and Summer. The first one looks really nice with high waisted jeans and has a cute gold button at the back, this was only £6 which is a great price and I think this looks nice with a cardigan over the top like the one above. The next top was £7, it is also available in coral for £6. This one is slightly sheer, but not enough to worry about putting something underneath if you don't want to, however it does look sweet layered over a vest. I am planning to wear this with a grey bandage pencil skirt that I have as well as more casually with shorts and jeans. The dotty crop top was only £4 which I think is such a good price, they have this top in several colour ways and patterns so I may be tempted to return for more of these as well! I will wear this mostly with high waisted jeans or shorts so that my mummy tummy and stretch marks are not on show but I like that it is a basic everyday t-shirt with a bit of a difference with the length and scalloped edges. Finally I got this bright pink top, again for easy to throw on every day wear. This one is very sheer so I will wear it over a white vest, or a pastel coloured vest. I also plan to cinch this with a skinny belt for a variation on the look. I believe this was also £4.
I was very pleased with my purchases and think I did well to get so many pretty things without spending much money!


Sorry that these pics are up the wrong way, I am not sure how to turn them!! These 4 tops were all from Primark and I went for styles that I will be able to wear throughout the Spring and Summer. The first one looks really nice with high waisted jeans and has a cute gold button at the back, this was only £6 which is a great price and I think this looks nice with a cardigan over the top like the one above. The next top was £7, it is also available in coral for £6. This one is slightly sheer, but not enough to worry about putting something underneath if you don't want to, however it does look sweet layered over a vest. I am planning to wear this with a grey bandage pencil skirt that I have as well as more casually with shorts and jeans. The dotty crop top was only £4 which I think is such a good price, they have this top in several colour ways and patterns so I may be tempted to return for more of these as well! I will wear this mostly with high waisted jeans or shorts so that my mummy tummy and stretch marks are not on show but I like that it is a basic everyday t-shirt with a bit of a difference with the length and scalloped edges. Finally I got this bright pink top, again for easy to throw on every day wear. This one is very sheer so I will wear it over a white vest, or a pastel coloured vest. I also plan to cinch this with a skinny belt for a variation on the look. I believe this was also £4.
I was very pleased with my purchases and think I did well to get so many pretty things without spending much money!
Friday, 27 January 2012
How to Make Glitter Nail Polish
This is a really easy idea which is a great way to recycle unused or old clear nail polishes!
You will need:


Some old clear nail polish, nail polish remover or nail polish thinner, a selection of glitters.
My bottle of nail polish had a lot of hard product around the lid and was hard to open, so the first thing I did was clean around the bottle using a cotton wool pad and some nail polish remover. Next I poured a few drops of nail polish remover into the bottle to thin out the polish. Make sure you only add a few drops at a time to ensure that you don't make the polish too thin! The bottle I had was very old and therefore the polish had gone really gloopy, but you can miss out this step if your polish is still thin enough to use. Give the bottle a good shake, the best technique to use is to put the bottle between your palms and roll it, as this will prevent the neck of the bottle becoming stuck like mine was!
 Next you need to choose your colours, I wanted to stay away from the usual golds and silvers and create a playful look. I also used 3 different sized glitters for a bit of variety.
 Now the fun part! Pour in a little bit of each chosen colour into the bottle, I have a handy little funnel which I got with a random hot chocolate gift set but you can just carefully pour straight into the bottle, just make sure you don't pour in too much!
I would also suggest doing one colour at a time and mixing the glitters using either the rolling technique or a wooden skewer in between each new colour. This is because the effect does not always end up as you imagined so you may decide to skip a few colours!


You will need:


Some old clear nail polish, nail polish remover or nail polish thinner, a selection of glitters.
My bottle of nail polish had a lot of hard product around the lid and was hard to open, so the first thing I did was clean around the bottle using a cotton wool pad and some nail polish remover. Next I poured a few drops of nail polish remover into the bottle to thin out the polish. Make sure you only add a few drops at a time to ensure that you don't make the polish too thin! The bottle I had was very old and therefore the polish had gone really gloopy, but you can miss out this step if your polish is still thin enough to use. Give the bottle a good shake, the best technique to use is to put the bottle between your palms and roll it, as this will prevent the neck of the bottle becoming stuck like mine was!


I would also suggest doing one colour at a time and mixing the glitters using either the rolling technique or a wooden skewer in between each new colour. This is because the effect does not always end up as you imagined so you may decide to skip a few colours!

Once you are happy with the colour mix you can simple mix the bottle well, this may take a few minutes as the glitter tends to stick at the bottom of the bottle! Hey presto your own homemade glitter polish!

Here is the finished polish on my nails, this is just one coat, I could apply more layers for the polish to become more sparkly!! Excuse the red line, I am not sure where that came from!!
Things to note: Some glitters will bleed colour into the polish, so the base may be tainted. You can see in the picture above where this has happened and the polish has a brown tinge to it.
I got my glitters from Tesco's and The Range.
I am going to keep a look out for different sized, shaped and colour glitters. What colours will you try?
Tuesday, 24 January 2012
Birthday Goodies!
Its not my birthday until February but my husband and I don't get many days off together so we went shopping today, yay!
I love to get as much for my money as I can and I think I managed to get a few good bargains.
Firstly I found this top in H&M and I absolutely love it! It was £12.99 which I think is a brilliant price and I plan to wear this with a gray pencil skirt and also my American Apparel Disco Pants!
 I also got a few bits and pieces in New Look. Vests are always useful and I like the spaghetti strap type the best, I have also needed a plain black one to go under a loose draped dress for months but it has been impossible to find one, so I was very happy to pick these two vests up for only £2.49 each! I was going to go back and get more colours but I forgot, opps!

 I also picked up these two pairs of skinny jeans, after having Thomas last February I am now back to my pre-baby weight, however I found that I am a different shape, so I got rid of most of my jeans! Over the winter I picked up a black pair, an indigo denim pair and an olive green pair, so I fancied some more spring/summer friendly colours and got a lilac pair for £16.99 and the stonewash pair for £20.00. I really like New Look jeans and find that they are one of the best shops to get jeans for my body shape. I then picked up this cropped mint lace t-shirt, which I will wear over the vest tops. This top was £14.99 and I think this will be such a cute little day top.
I hope you like all my items, I am going to try and wait until my birthday before I wear any of them!

I love to get as much for my money as I can and I think I managed to get a few good bargains.
Firstly I found this top in H&M and I absolutely love it! It was £12.99 which I think is a brilliant price and I plan to wear this with a gray pencil skirt and also my American Apparel Disco Pants!


 I also picked up these two pairs of skinny jeans, after having Thomas last February I am now back to my pre-baby weight, however I found that I am a different shape, so I got rid of most of my jeans! Over the winter I picked up a black pair, an indigo denim pair and an olive green pair, so I fancied some more spring/summer friendly colours and got a lilac pair for £16.99 and the stonewash pair for £20.00. I really like New Look jeans and find that they are one of the best shops to get jeans for my body shape. I then picked up this cropped mint lace t-shirt, which I will wear over the vest tops. This top was £14.99 and I think this will be such a cute little day top.
I hope you like all my items, I am going to try and wait until my birthday before I wear any of them!

Sunday, 22 January 2012
A few bargains
I popped into town yesterday and as I had Thomas with me I only stayed for an hour but I did manage to find a few bargains in that time!
 Firstly I picked up a Body Shop body butter. I'm sure you have all tried these out before and know how good they are but I thought I would share as the Christmas ones are on sale for £5 at the moment, they are usually £12.50 so that was a really good price! I picked up the almond one and already had the papaya scented one as a Christmas pressie.

 I also visited Zara and found these 2 tops both were only £9.99! The first one is a cream cardigan with silver beading round the collar. I really wanted a pretty cardi that I could throw over most outfits and I think this one will be perfect, especially as it was reduced from £36! The second top is casual with long sleeves and has a funky blue and mustard leopard print panel at the front. As we will soon be in spring it is probably the wrong colour to buy at the moment but I always love animal print so I am sure it will get worn lots in February and again next Autumn/Winter!

I needed to replace my Mascara and I always use Maxfactor Flase Lash Effect Fusion this is the one that comes in the purple tube, you can also get the version in the black tube which has a more natural look but the one I choose is for volume and length. They also have a limited edition Gold tube at the moment which I believe is the same actual product as the black one. This mascara is £11.99 and you can get this in all the usual shops, I tend to go to Boots so I can get my points! I will add a picture of my lashes as well.
The reason I wanted to mention this buy was that at the moment if you spend over £10 in Boots on Maxfactor then you get a free Max Effect mini nail polish, which usually sell for £3.99. I choose the shade Fantasy Fire which is a purple with a red shimmer through it. I am not usually much of a purple person but have soooo many polishes and wanted to get a colour that was not similar to anything I already own.
The application of this polish was really smooth and it dries so quickly, which is always a bonus when you have a baby! It does go on very sheer and it actually took me 5 coats to get a shade that looked like the product appears in the bottle, however it looks quite pretty with less coats as well. In this picture I have one coat on my thumb and an extra coat on every following finger until we get to 5 coats on my pinkie finger. I applied it yesterday so will have to let you know how well it wears and when it starts to chip but overall I was impressed with this polish and think it makes an excellent little freebie!


I needed to replace my Mascara and I always use Maxfactor Flase Lash Effect Fusion this is the one that comes in the purple tube, you can also get the version in the black tube which has a more natural look but the one I choose is for volume and length. They also have a limited edition Gold tube at the moment which I believe is the same actual product as the black one. This mascara is £11.99 and you can get this in all the usual shops, I tend to go to Boots so I can get my points! I will add a picture of my lashes as well.
The reason I wanted to mention this buy was that at the moment if you spend over £10 in Boots on Maxfactor then you get a free Max Effect mini nail polish, which usually sell for £3.99. I choose the shade Fantasy Fire which is a purple with a red shimmer through it. I am not usually much of a purple person but have soooo many polishes and wanted to get a colour that was not similar to anything I already own.
The application of this polish was really smooth and it dries so quickly, which is always a bonus when you have a baby! It does go on very sheer and it actually took me 5 coats to get a shade that looked like the product appears in the bottle, however it looks quite pretty with less coats as well. In this picture I have one coat on my thumb and an extra coat on every following finger until we get to 5 coats on my pinkie finger. I applied it yesterday so will have to let you know how well it wears and when it starts to chip but overall I was impressed with this polish and think it makes an excellent little freebie!

Friday, 20 January 2012
Its been so long...
Wow! I can't believe that I have not posted a blog for so long, and I only managed to do a few months! The reason that I stopped was because I broke my camera and thought that posting without pics would be far too boring! However I got a new camera for Christmas, hoorah, so I can now start blogging again!
NOTD

 Anyway I have decided to show a Nail of the day as my returning post and this was actually a design that I wore back in November but I really liked it and got lots of comments and compliments on it so I thought I would share it! The hand in the pic is actually my sister's friend as I did the same design on her a few weeks after I had worn it and the hand with the gold and black nails is my sister, I did her nails as well.
To get this look I used black and lime green striper/dotting pens, which I got in a set of 60 from Amazon and they were an absolute bargain of about £25 for the whole lot, GOSH nail paint in Miss Mole, Missguided nail paint in Misscellaneous, which I actually got free with a magazine ages ago and OPI nail paint in Copper Mountain Copper. The pinkie nail is the nude shade with gold mylar flakes overlaid onto it ring finger has a stripe and a lime green leopard print on it, middle finger is the nude with gold glitter along one side, index finger is nude, gold mylar and a little leopard print at the free edge and the thumb is the same as the ring finger but with nude coloured leopard spots.
It is quite hard to see in the picture but the black and gold nails are similar as well.
I hope you like the look!
NOTD


To get this look I used black and lime green striper/dotting pens, which I got in a set of 60 from Amazon and they were an absolute bargain of about £25 for the whole lot, GOSH nail paint in Miss Mole, Missguided nail paint in Misscellaneous, which I actually got free with a magazine ages ago and OPI nail paint in Copper Mountain Copper. The pinkie nail is the nude shade with gold mylar flakes overlaid onto it ring finger has a stripe and a lime green leopard print on it, middle finger is the nude with gold glitter along one side, index finger is nude, gold mylar and a little leopard print at the free edge and the thumb is the same as the ring finger but with nude coloured leopard spots.
It is quite hard to see in the picture but the black and gold nails are similar as well.
I hope you like the look!
Subscribe to:
Posts (Atom)